| |
Chapter 2
Code and Rule Checking in the Design Flow
HDL Capture Tools
As stated in Chapter 1, one of the first tasks a designer needs to do is capture a description of the design using a HDL (Hardware Description Language). e.g. Verilog or VHDL. The objective at this stage is to create high-quality code as quickly as possible before moving on to the simulation stage. As design capture can be a very time consuming and error prone process, there are a number of tools that can help a designer improve productivity and enhance the quality of the HDL code produced at this stage.
These tools can be classified as:
Text Editors
Nearly everyone, at one time or another, has used a text editor to create or alter a piece of ASCII text and discovered that the basic text editors offer simple facilities such as the ability to copy and paste text, search and replace text strings and format text using tabs (tabulation characters) or spaces.
Some of the more advanced text editors enable text to be automatically indented and color-coded whenever certain keywords or constructs are detected. Although this facility is useful, because it shows the structure of the captured code, it does not help in isolating and identifying any coding problems or syntax errors. (e.g. a missing semicolon (;) symbol at the end of a line or an opening or closing quote (') mark omitted from a text string.)
There are also programmable editors that have language specific modes of operation that automate and enforce a standard set of coding standards. This is normally achieved by using a predefined template that specifies the coding standards that will be used by the editor. As the information held in the template is fixed it is not very easy for the user to make changes to the defined coding standards.
Linters
The original concept of `linting' comes from languages like C and C++ where linters are used to check for inconsistencies within the code that had been written. For example, checking that a value passed to a procedure or function was the correct type (i.e. integer, boolean, string, etc.) and that it matched what had been declared in the main body of the program. Linters were also used to check for possible portability problems when code was moved from one implementation of C to another. (e.g. K & R to ANSI C.) Because Verilog and VHDL have a syntax very similar to C and Pascal respectively, it was natural for linters to appear for these two HDL languages.
VHDL is a strongly typed language and this means it is relatively easy task for a linting tool to check for any inconsistencies in the source code. Verilog on the other hand is a loosely typed language that allows registers to be overloaded or array boundaries to be exceeded. So here the linting tool has to detect "logical" coding errors that would otherwise be acceptable to Verilog. A simple example of this type of coding error is shown below where a vectored net is assigned to a signal of a different width.
Depending upon the sophistication of the linting tool, other forms of checks that may be applied include: range and index checking, checking whether a variable is used before it has been assigned and width checking.
Graphical Editors
Consider the task of capturing a complex FSM (Finite State Machine) containing a large number of states and conditional transitions. In this situation a designer is normally faced with the task of writing a series of involved `case' constructs where each `case term' defines a state and the conditions that must be satisfied in order to move onto the next state. Although a designer may be willing to undertake this task at the initial design stage, it can get very tedious and time-consuming altering the HDL code whenever changes are made to the operational sequence of the FSM. In this particular situation graphical editors can prove very useful, because as well as saving time at the design capture stage they also present the designer with a pictorial image of the FSM that makes it easier to understand the interactions within the FSM.
For example, consider the state diagram shown in Figure 2-1. It is normally easier to see the interactions between the various states using a graphical presentation than trying to decipher a block of HDL source code that may span a number of printed pages.
Rule-based Checkers
Rule-based checkers, unlike the simple linting tools with fixed rules, make extensive use of configurable rules to check the quality of the HDL code produced at the design capture stage. As the number of rules that are available with these types of checkers can be extensive, it is normal practice to organise the rules into rule-sets or lists that relate to certain aspects of a designer's work. For example, a selection of the rules could be gathered together to specify how HDL constructs should be coded. Another rule-set might contain rules that refer to things such as allowable file name suffixes, number of modules per file and the maximum line-length of the HDL source code. Other rule-sets may be needed in a company to ensure that corporate standards such as documentation procedures and naming conventions are correctly applied by all the design engineers.
Some examples of the typical content for the above rule-sets are given below.
Coding rules
* Each VHDL architecture should have only one clock.
* Clocked designs must be synchronised on the rising edge of a clock signal.
* In a finite state machine, for each state there must be a defined next state with an associated output value.
* `Case' statements must be complete (i.e. contain a default or a when others clause).
Style rules
* The length of a text line should not exceed 100 characters.
* Each line should only contain a single VHDL/Verilog statement.
Documentation rules
* Each HDL source file must contain a comment block.
* The start of each control block (e.g. always block) must be commented.
Naming rules
* Each clock signal must start with the prefix `clk'.
* All active high signals must end with the suffix `_h'.
The concept of having dedicated rule-sets can be taken a stage further by combining a selection of the individual rules from one or more of the rule-sets to form a rule-database or rule-category. For example, the following rule-databases could be constructed for a specific HDL (e.g. Verilog or VHDL) by carefully choosing specific rules from the established rule-sets.
Best Practices
As the name implies this rule-database contains rules that represent good HDL coding practices as applied to Verilog or VHDL.
RMM
This rule-database contains rules that reflect the guidelines that appear in the book entitled Reuse Methodology Manual. (See Appendix-A On-Line Resources and Further Reading for more details regarding this publication.)
OpenMORE
The rules in this rule-database are effectively the same as the set of rules in the RMM rule-database. The main difference is that a score is applied to each rule in accordance with the OpenMORE design scoring system devised by Synopsys and Mentor Graphics. Points are awarded whenever a rule is successfully achieved. No points are awarded if a rule is broken. At the end of the checking process the overall number of points that have been scored indicates the quality factor or `goodness' of the design.
Synthesis
The rules in this rule-database perform checks to ensure that the HDL code that has been used in the design is synthesizable. This particular rule-database is very useful as it can avoid wasting time at the synthesis stage trying to synthesize non-compliant code.
Portability
This rule-database contains rules to check that HDL code is transportable from Verilog to VHDL or from VHDL to Verilog. This particular rule-database is very useful in situations where dual languages are used within the same company.
Although the above set of rule-databases should cater for the majority of tasks a designer will encounter, there may be occasions where a specialised rule-database is required to satisfy a specific design-constraint or project requirement. This can be accomplished by constructing a custom rule-database by selecting one or more rules from any of the existing rule-databases and then, if needed, adding additional dedicated rules (that have been previously written) to extend the overall effectiveness of the rule-database.
An example of a specialised rule database may be one that contains rules that represent a proprietary DFT (Design For Test) methodology.
Figure 2-2 shows how basic rules are grouped into rules-sets (e.g. Coding rules, Style rules, Documentation rules, Naming rules) and how the rule-sets can be combined together to form rule-databases.
At the start of this section it was mentioned that rule-based checkers make extensive use of configurable rules. Because there are various ways in which each basic rule could be configured some examples of how this can be achieved are listed on the following pages.
Rule Checking and the Design Hierarchy
In addition to configurability the other fundamental difference which distinguishes rule checkers from simple linting tools is the ability to analyze the design as a whole and to apply the relevant rules across the hierarchy. This capability is essential in checking hardware description languages because the actual problem may cross several hierarchical boundaries and involve a number of the design modules. A typical example of this is a combinational feedback path which has resulted from incorrectly connecting a module or group of modules at a higher level in the hierarchy.
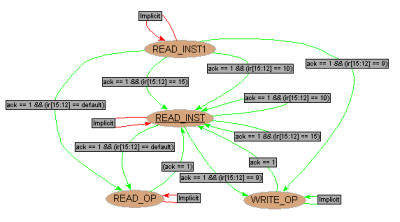
Figure 2-3 contains examples of hierarchical rules from a commercially available rule checker. In order to apply these hierarchical rules the design needs to be built in some way. This is often referred to as elaboration or flattening the hierarchy. This process can be expensive in terms of run time and computer memory. VN-Check™ from TransEDA® uses a `demand-driven' synthesis technique to minimize the impact of applying hierarchical rules.
Figure 2-3Each rule can have a value or attribute attached to it that defines how the rule will be used and what degree of checking is to be applied. For example an attribute could be a two-way switch which is used to indicate whether the particular requirement that the rule is checking for is allowed/disallowed or required/not required in the HDL code. Checking which edge of a clock is the active edge is another example of how attributes could be used. In this situation all clock signals could be checked to ensure that the same clock edge is used (all positive or all negative) or that clock edges are consistent across the whole design. Numerical quantities or text strings could also be used as attributes to define the value and type of check a rule should perform.
To see how rules can be configured to match a company's code of practice consider the following guidelines that designers in a particular company should adhere to.
Listed below is a typical group of rules that will check for the above situation.
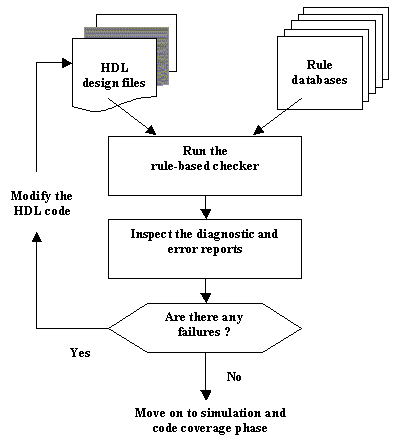
After the relevant rules have been chosen and set up, the next step is to run the various HDL source code files through the rule-based checker and see which rules have been violated. This step normally involves inspecting the diagnostic and error reports produced by the rule-based checker to determine which line(s) of code contain errors and what actions are required to fix the problem(s). The modified HDL source files are then re-run through the rule-based checker. This iterative process is repeated until all errors have been fixed or the reasons for any outstanding errors have been explained and accepted by the designer.
Figure 2-4 shows the sequence that is normally used to select the rule databases and HDL design files prior to running the rule-based checker.
Appendix-B contains some practical examples of how a commercial rule-based checker can be used to check a set of HDL source files.
The actual rule-based checker used in Appendix-B is VN-Check™. This is a configurable rule-based checker that is available from TransEDA, as an optional module in their verification environment known as Verification Navigator©.
|
|
|